If you’ve ever typed “how to create model images for jewelry website” into Google, you already know that running an online jewelry store is tough. Your jewelry is stunning in person, yet on your website, it can appear plain, bland, or even boring. Why? There is nothing wrong with your product; in fact, if your visitors only view the plain jewelry photo with a white background, they will have no idea how they will look when they wear it.
Perhaps you think it's difficult to take model photos, but in reality, you don't need any specialized skills or a lot of money. With just a few easy steps, you may use an AI tool, your phone, or a buddy as a model. This post will teach you how to create real and AI model images for your jewelry website.
This post will demonstrate how to create model images in two ways: using genuine model photos and AI-generated photos. There is no need for a large studio, personnel, or budget.
Why model images are important for your jewelry website
Model photos answer three important questions for your visitors:
1. How big is this jewelry in real life?
Model photos show buyers how big jewelry is. Visitors may easily tell how big the jewelry is after looking at the model pictures.
2. Does this style of jewelry go with my style?
Is this ring simple, bold, or outdated? Do the earrings suit my outfit? Buyers can quickly learn the answer from your jewelry model images.
3. Can I wear it every day, or only on special days?
Visitors can determine from your jewelry model images whether the jewelry is casual enough to be worn every day or if it is suitable only for special occasions.
Visitors also trust you when you have excellent images of models. When they see clean and consistent jewelry model images, they think your company is serious and your products are real, not just downloaded from the internet. They spend more time on your website and are more likely to place an order.
Before 2018, all of the photographs on my website had white backgrounds. I didn't know it was a giant deal until more and more visitors sent me messages asking about the size of the item or other things. Then I noticed that some of my competitors' websites were employing real people to show off their items. I told my friend who was wearing the jewelry to take additional shots. Thereafter, I changed all my jewelry listing photographs. After I changed the picture of the jewelry model, my website's conversion rate went up from 0.3% to 0.8%.
Now, let's find out how to place jewelry on model.
Take photos of models with real people.
To start, you don't need a large space or paid models. You can model yourself, a buddy, or a devoted customer. To take your first pictures, all you need is a simple setup beside a window and a basic checklist.
A simple list of things to do to get ready
Getting ready for jewelry
Clean each jewelry piece with a soft cloth, removing dust and fingerprints.
Choose what to shoot and how many angles you want for each object.
Put similar items together. If you want to take photos for five pieces of jewelry—two pairs of pearl earrings, one pair of gold earrings, one pearl necklace, and one silver bracelet—you may use the same scenario if you arrange the pearl earrings and necklace together.
Getting the model ready
Choose clothes that are plain and solid so the jewelry stands out.
Tell the model to use lotion on their hands, neck, and ears to make their skin seem healthy.
Keep your model's makeup natural unless your brand is really bold or amazing.
Space and gear
A phone or a camera
A simple tripod
A window with plenty of gentle light
A simple wall or background
Light and background
Tell your model to stand or sit so that the light hits them from the side, not the back.
To reflect light, place a white card or foam board on the dark side of the model's face or hand. This reduces the harshness of shadows while also improving the appearance of metal and stones.
Don't forget to make the background simple. A basic wall, a large sheet of paper, or a light-colored cloth will work well. Avoid putting intricate designs or strong colors behind the jewelry.
Simple ways to pose with different types of jewelry
You do not need to perform difficult, high-fashion poses. The model typically performs better and finds it easier to move in basic, natural ways.
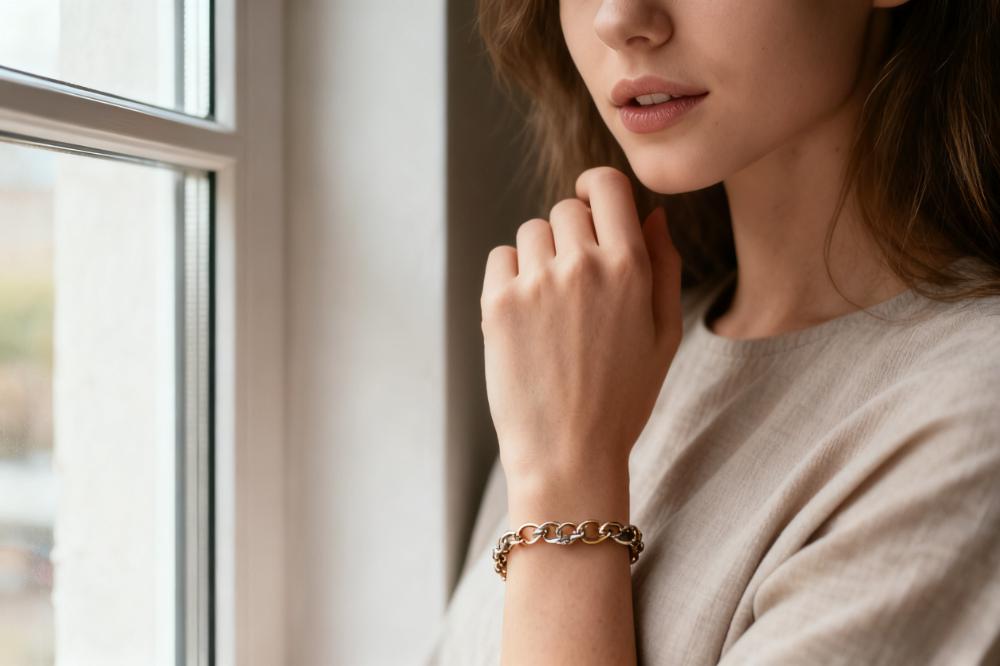
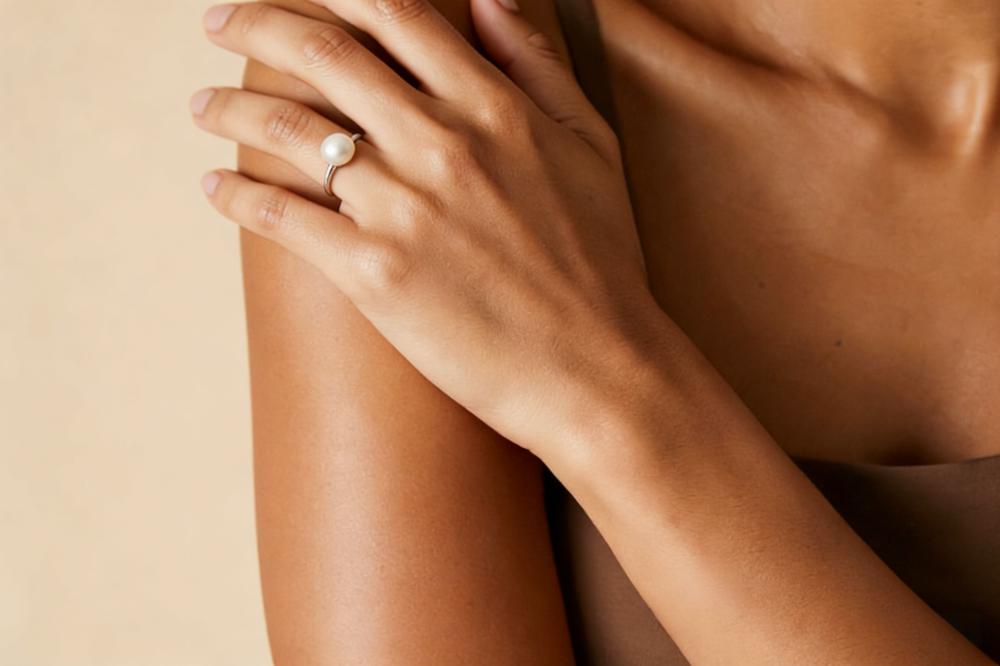
Bracelets and rings
Tell the model to gently touch their hair, hold a mug, or place their hand on a book.
Keep your fingers flexible, not stiff as a claw.
Take close-up pictures of the hand and a few broader shots that reveal more of the individual.
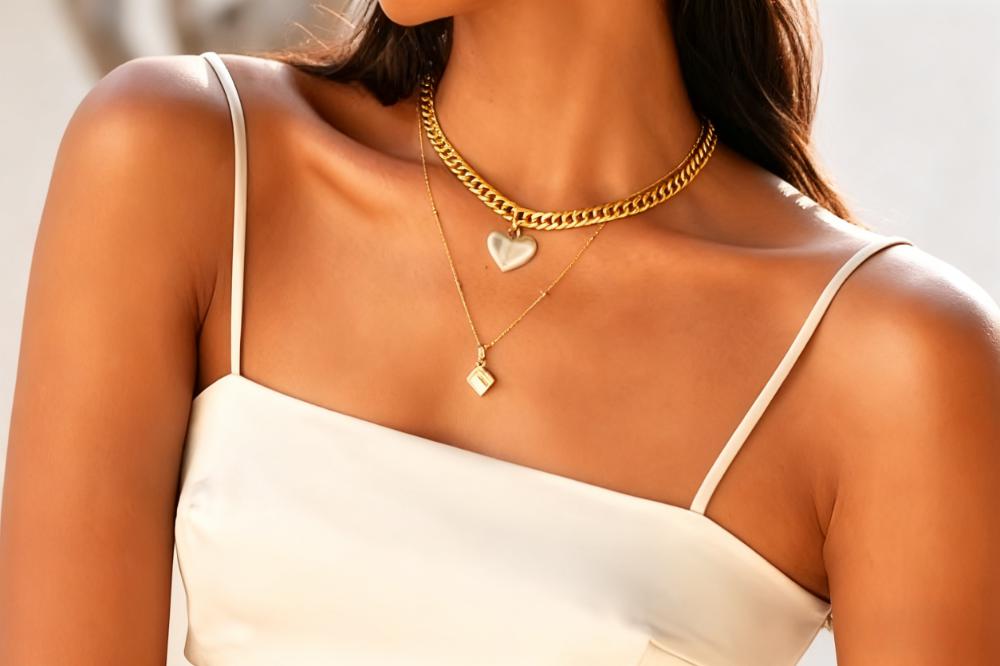
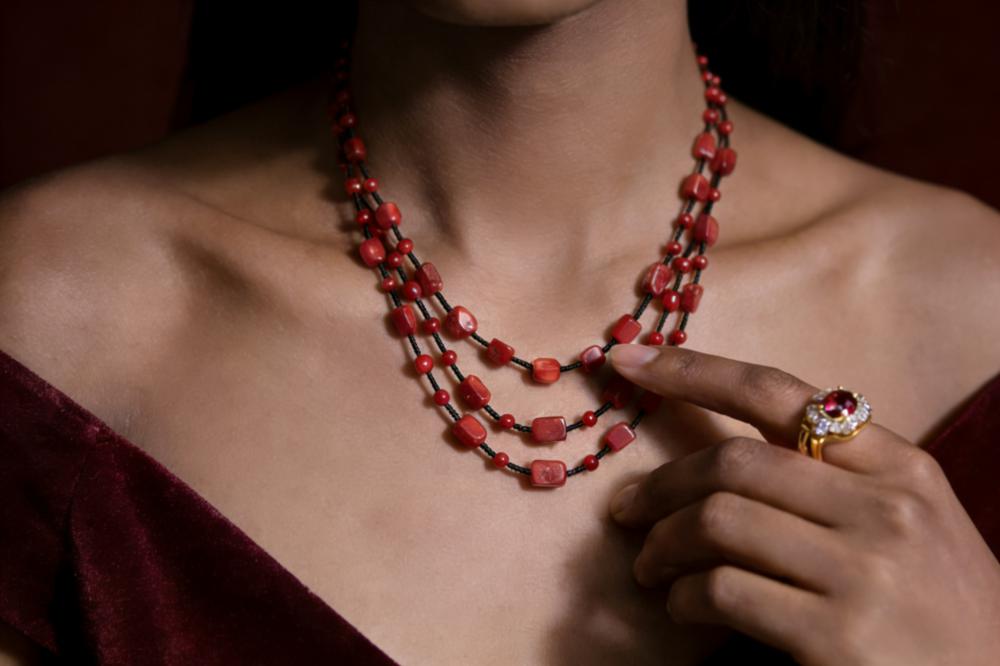
Necklaces
Tell the model to move their head or elevate their necklace slightly.
Do not let your hair cover the necklace or pendant.
Take one photo straight on and one with a slight tilt.
Earrings
Show how the earring hangs by using side and three-quarter shots.
Tell the model to tuck their hair behind their ear.
Buyers should be able to see both the details and the big picture, so take a mix of close and mid pictures.
Use AI to combine jewelry upon a model.
Instead of only talking about it, let me show you how this works in real life. This video shows how to start with a simple jewelry product photo and use AI JEWELRY MODEL tool to place it on an AI fashion model in just a few clicks.
AI-generated images are helpful if you believe that taking pictures of jewelry on actual models is difficult, particularly if you have many goods, a limited budget, or no one willing to be photographed.
When do AI model images make sense?
AI is ideal for testing multiple styles or backdrops fast.
You need models with different skin tones, ages, and genders.
You don't have the time or money for a complete photoshoot right now.
You can always add genuine model photos later for important products or campaigns.
Create powerful base product photos.
AI cannot improve a terrible product photo. Therefore, if the jewelry is fuzzy, dark, or reflective, the results will be off.
For your base photo:
Choose a plain background, such as white or light gray.
Ensure that the jewelry is clear and well-lit.
Stay away from bright reflections.
Use high-resolution pictures to preserve details during the AI process.
Use an AI workflow that does not depend on a single tool.
First, put the cleaned picture of your product into the AI tool.
Choose a model reference or upload one (if the tool enables you).
Pick the setting or situation you want, such as a studio, street, party, or office.
Thereafter, write a short note on the last picture you want.
You can also say what you don't want the picture to contain, such as extra hands, text, or other jewelry.
Finally, make a few different variations and choose the best ones for your site.
You can copy and alter this simple prompt template:
“Close-up of a young woman with a (gold minimalist) ring on her finger. The lighting is soft, the background is neutral, and the focus is on the ring and hand. Maintain the authentic skin texture.”
And a simple negative prompt:
“No extra hands, no extra jewelry, no text, no logo, no distortion, and realistic proportions.”
Check AI images carefully.
Before you put AI pictures on your website, zoom in and look for:
Strange hands, fingers, ears, or necks
Jewelry that looks like it's floating or sinking into the skin
Weird text or logos in the background
Colors that don't match your real jewelry items at all
If an image doesn't look correct, delete it and make a new one.
Edit and preserve the same look.
Your images should all appear like they belong to the same brand, whether they were taken by a person or an AI.
Make a style guide that is easy to follow.
Background color
Consider the type of light used, such as soft natural light or a softbox.
Angles you like (front, 45°, side)
The style of editing (brighter, softer, more contrast, etc.)
You don't need a lot of paper. A single page of notes will help you maintain your pictures the same over time.
Basic editing steps for beginners
You can use any tool you like, including your phone's editor, a simple app, or software that works online. Pay attention to a few important changes:
Change the brightness and contrast so that the jewelry is easy to see.
Adjust the white balance so that gold, silver, and stones look real.
Remove rid of dust stains or other things that are clearly distracting.
Cut the picture so that the jewelry is the main focus and not too far away.
Don't edit too much. It's better to keep the skin's texture and the metal's sheen real than to make everything look fake and synthetic.
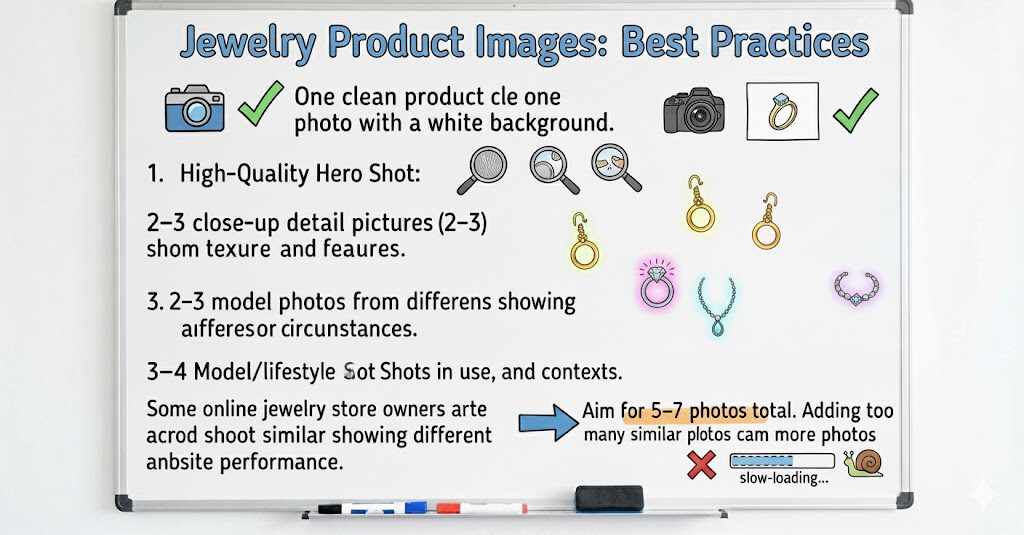
How many images do you need for each product?
Usually we need at least:
We typically require at least one clean product photo with a white background.
2–3 close-up detail pictures.
2-3 model photos from different angles or circumstances.
You may always add more photographs later, but this provides a strong foundation for each product page.
Most listings do not require more than 5-7 photos. Some online jewelry store owners believe that more photographs are better and shoot similar photos; however, they disregard another issue: more photos slow down your website's loading performance.
I added double model photos to one of my jewelry websites in 2020 because I thought customers would like them and imagined my order would increase. However, I didn't realize it was completely incorrect until I noticed that the average time on page dropped from 1:47 to 0:52 and the bounce rate went from 41% to 68%.
I was genuinely perplexed by this. It took me a long time to find out why—you would think that additional images would make the product easier for buyers to grasp, wouldn't you? That is, until I realized that the website was loading twice as slowly as it used to. Then it dawned on them: all those pictures were slowing down the pace. The overload was causing the bounce rate to skyrocket as time on site decreased, and I hadn't compressed any of them.
I immediately got to work after learning the reason: I compressed each picture, removed those that were repeated or identical, and saved just the most helpful ones. Fortunately, the site's stats steadily improved over the following three months. That's when I realized it's really useless to just keep adding photographs.
As website owners, we understand that loading speed is more important than displaying photographs. Therefore, the best solution is not to just add more photos without considering loading speed.
Where should model photos be placed on your website?
Pictures of models aren't only for show. They should be positioned strategically on your site to enhance visitor experience. Put them where they can actually help visitors make choices and feel positive about themselves.
Product pages
A simple order that works well is
The first picture is of a product on a clean white background.
The second picture shows a model wearing the jewelry in a plain and basic way.
Third and fourth: more angles and close-up shots
Fifth: a photo of your lifestyle or scene, if you have one
In this manner, the buyer can quickly see the goods clearly, how they look on a real person, and then all the tiny details.
Pages for categories and searches
On category or search pages, small thumbnails should be simple to see and tidy. You can utilize pictures with white backgrounds to make a nice grid if you sell many products.
Use model photos of your most important or best-selling products to get more people to notice them.
Banners and stories on the homepage
Put your greatest model photographs on your homepage. Use them to:
Show off a new collection.
Show the general vibe of your brand.
Choose a seasonal theme, such as "Summer Layers" or "Winter Gifts," to focus on.
Things to avoid doing wrong
When jewelry sellers first start using model images, they often fall into these traps:
Busy clothes and backgrounds—The clothes or background of the model are so busy that the jewelry gets lost.
Stiff poses—The model seems uncomfortable because their hands and shoulders are tense.
Different styles—Each product has its own background, lighting, and editing style, which makes your site look messy.
Wrong focus—The camera is not focused on the jewelry item; it is mushy and out of focus.
Unchecked AI bugs—AI problems like extra fingers, weird ears, or jewelry that cuts into skin.
If you don't run across these challenges, you're already ahead of a lot of online jewelry companies.
Quick FAQs for online jewelry sellers
Is it necessary for me to hire professional models?
No. For a lot of small brands, employing yourself, friends, or regular buyer works great. The most important things are natural poses, minimal clothes, and pure light. I asked my friend to model first, and the new jewelry model shot looks wonderful.
Would it be possible to shoot everything with my phone?
Yes. Phones are really powerful nowdays. If you use a tripod, strong window light, and simple editing, phone pictures are more than good enough for your website.
How many model images do I need for each product?
Try to get 3–4 pictures of models together with pictures of your product and its details. For bestsellers or high-value items, start small and add more.
Is it okay to use both AI and real model photos?
Yes, but make sure that all of the product pages look the same. Don't mix AI and real pictures of the same item unless they look very similar.
Will model images cause my website to load more slowly?
Although large images might cause lag, you can reduce their size before uploading. Aim for images that are both large enough to seem clear and sufficiently little in size (a few hundred kilobytes each).
What other Reddit sellers are saying
This is something that others are also learning. On Reddit, a lot of jewelry sellers discuss how they handle photos, how AI has helped them, and where they still feel stuck.
Here are some real-life examples and what we may learn from them.
Story 1 – A classic setup with clean product shots and precise model cropping
One person on Reddit talked about how they usually take pictures of jewelry:
Most of the pictures show well-lit items on a plain background, frequently on stands.
Then they put one or two pictures of the jewelry on a model.
The camera doesn't have a wide angle; it zooms in on the necklace or earrings.
Usually, the model's face is cut out or only partially exposed.
The jewelry is the important thing to look at; the model gives it scale and perspective.
This is a forceful base. If you have many ideas but don't know where to start, this simple framework is a wonderful place to start: crisp product pictures and a few tight model crops.
Story 2 – Testing AI models before and after
Another seller posted a simple test that showed how things changed.
Previously, they had a conventional flat graphic of a clothing item on a plain white background. They used AI to make a realistic model shot in approximately a minute after that.
This is how they put it:
What worked: saving time and money on the model, studio, lighting, and editing.
They could change the models, postures, and styles.
What didn't work: Some photographs still required to be edited by hand to look ideal.
AI seems less inventive.
It mostly gave "normal templates" instead of crazy concepts.
In general, they said that AI would change the game for product visuals in terms of time and money. They're not completely replacing traditional shots, but AI can now do a lot of what they need.
Story 3 – "How do I get the model to wear my jewelry?"
Another Reddit user thanked everyone for their aid and then discussed the main problem they were experiencing:
They can make a computer model that looks like them, but they don't know how to ask for a picture of the model wearing jewelry that looks like their real design.I don't know how to make a model wear jewelry that looks like mine.
More discussion can be found from this link: https://www.reddit.com/r/midjourney/comments/1lg48o2/create_photos_of_models_wearing_jewelry_from_my/
Someone in the answers said that putting a specific, real-world product with a created model is one of the hardest things to achieve using tools like Midjourney. The ideal way to do things sometimes depends on the exact picture of the product you have.
Many others have also considered this. This approach is made to fill that gap perfectly. You start with a good photo of your genuine jewelry, and then you apply AI in a regulated way so that the final model image still appears like your piece and not a random design.
A summary and a list of things to do
You don't need excellent pictures to begin. All you need is a simple system that you can use over and over.
This week, you can follow this short list of things to do:
Choose one thing you really want to sell.
Choose a style: bright, somber, simple, or natural.
Make one picture of the product, either actual or made by AI.
Add it as the second image on the site for your product.
Check after one or two weeks: Did clicks, time on page, or sales change at all?
AI Jewelry Model is a good assistant.
You can use this guide with any tool or none at all. But if you still think the AI component is too much, I made a little tool particularly for this situation. It is termed the AI JEWELRY MODEL.
Try Free AI Jewelry Model Generator
The idea is straightforward:
You upload a picture of your jewelry, pick the model and scene you desire, and the tool makes pictures of it without you having to deal with sophisticated settings or long prompts.
You don't have to utilize it, of course. You can test it here, AI JEWELRY MODEL, if you want to speed up the AI component and retain your look.
Following the steps in this guide will help you go from having "no model photos at all" to having a decent set of real and/or AI model shots on your jewelry website. Begin with one main product. This week, take some pictures of the model. You'll realize exactly why model photographs are worth the time and work once you see how much better it appears.